Photography
Digital SLR cameras have made high quality photography more accessible than ever. The sheer power of a carefully carried out digital workflow is a more important factor than the reduced cost of digital shooting. From the camera itself through processing software on the computer, photographer can now provide many different final products not so easily available before, like high dynamic range (HDR) images, time lapse and panoramic photography. Of course, production of true high quality material still requires a lot of hard work, but the range of possibilities has became wider than ever. A special page dedicated to panoramic photography can be found here.
Three main sections of this page contain both classical photographs and panoramas. Before you make your choice, to enjoy the best viewing experience it is advisable to read some tips on how to:
- View Virtual Reality (VR) panoramas
- Adjust your monitor for the best display of photographic material
Scroll down this page if you wish to read these instructions, and if you're already familiar with them - head on to the sections below.
Photography Sections
Instructions for viewing Virtual Reality (VR) panoramas
Traditional panoramas are viewed as conventional photographs, the angle and field of view are fixed and they can be printed on paper or canvas in their original form. Virtual Reality panoramas on the other hand offer you the possibility to view the photographed scene as if you were there, and they rely on your computer to process your commands. You have control of the virtual camera, you can pan your view over the available area, or you can zoom in and out. These panoramas in photo albums have a "(VR)" sign after their name.
Clicking on a VR panorama will open a page in your browser and start the Flash Player application. After the panorama is fully loaded, you can use the mouse and button commands in panorama window to view it:
- Pan Command: Left click and hold in panorama window, move the mouse to pan. Or, click the arrow buttons.
- Zoom: Use mouse scroll wheel. Or, click the "+" and "-" buttons.
- Fullscreen: The best viewing experience. Press "Esc" on your keyboard to exit.
- Autorotation On/Off: Click to turn off autorotation, this is convenient if you want the view to stay still where you pointed it.
Some panoramas will allow you to look all the way up (to zenith) and down (to nadir), and these are called Full Spherical (or Equirectangular) panoramas. Others have a limited field of view around the horizon, and these are called Cylindrical. Full spherical panoramas are exclusive but require much more work and special equipment to create, and therefore they have been photographed on places where technical conditions permitted. Read more about panoramas here.
How to adjust your monitor
Viewing conditions and adjustment of your monitor are the prime factors for correct display of photographs. Most of the material on this website has been carefully processed, and will deliver its maximum when viewed in a correct way. At the time of this writing, good CRT monitors still outperformed most LCD monitors when it comes to color rendition, and both types require different kind of attention when it comes to calibration. Proper monitor calibration for professional use is normally achieved by a special calibration device that is placed on the screen, and in the absence of these we'll have to revert to some test images and a very sensitive instrument called the human eye.
What follows are the very basics of monitor adjustment, readers interested in more can try a very good text called "Monitor calibration and gamma" on Norman Koren's website: www.normankoren.com
General Setup
Before you start adjusting your monitor, you should make sure that the source signal is good, meaning that graphics card of your computer is outputting correct data. The location for these settings should vary according to your operating system and graphics card manufacturer, but generally you should open "Display Properties" page and locate "Desktop Color Settings" or similar page. There you should find settings for "Brightness", "Contrast", "Gamma" and optionally "Vibrance". All of these settings should be reset to factory defaults before proceeding with further adjustment. After you have done your best with adjusting the monitor itself, you can come back here and do some fine tuning. Note: Adjustment of brightness and contrast with these commands should be strictly avoided, as it will most probably lead to clipping and loss of detail in displayed images, monitor commands should be used instead.In your monitor's menu, first you should set a profile that offers unaltered image display, it should be named like "Standard", "Photo" or "Professional". If available, color temperature setting on your monitor should be set to 6500K. This value provides for the best print matching display and should be used on LCD and CRT monitors. But since most people use their monitors only for viewing photographic material, it has been observed that color temperature of up to 9300K on CRT monitors delivers a more vivid display, and can be used instead of 6500K.
Black Level Adjustment
First of all, any monitor should be operated in dim ambient light condition, for example a room illuminated by a shaded lamp so that you can see all objects clearly. Complete darkness should be avoided, as well as very bright light coming from the outside or a light source directly illuminating the screen.The intensity of ambient light will affect the overall image contrast and reproduction of dark image details. Observe the test image below (image from Nokia Monitor Test software):
- For CRT users: Adjust the Brightness of your monitor so that boxes marked from 1% to around 3% just disappear. You should be able to see shades of grey from box marked 3% upward.
- For LCD users: Black level adjustment tends to be tricky on these, and usually these monitors display dark greys too brightly with boxes 1% to 3% clearly visible. This will lead to washed out image appearance, but there are two things that you can do. First, make sure that you are viewing your LCD monitor straight-on, especially your vertical viewing angle has to be around 90 degrees as the gamma parameter is very sensitive to that. Second, increase your ambient light brightness so that boxes 1% to 3% start to disappear. For this reason, LCD monitors perform far worse in very dark conditions than CRT's.
Contrast Adjustment
On CRT monitors contrast is usually set to 100%, unless it affects the sharpness of the small letters significantly. Depending on the CRT tube quality, you should find a value that is a compromise between sharpness and vivid image appearance that increases with contrast setting. CRT screens should be able to achieve luminance level of 100cd/m² at full white.Most LCD monitors do not have a dedicated contrast adjustment, but instead have "Brightness" or "Luminance" that acts in a similar way. Generally, these can be set to any desired value, but you will notice that it may affect the black level and rendition of highlights, so you might decide to compromise.
When it comes to maximum brightness level, LCD monitors reach luminance levels a couple times higher than CRT's, but still have lower contrast than good CRT's (like Trinitrons). The key is that contrast is defined and perceived by the eye as a relative difference between full white and full black level, and at the time of this writing LCD monitors still couldn't reach pitch black levels compared to good CRT's. For this reason and due to characteristics of the human eye, image on a good CRT still looks richer and more vivid than on LCD.
Gamma Adjustment
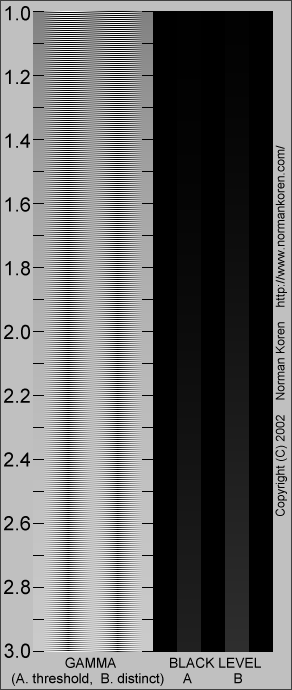 Gamma is a special parameter that affects tonal distribution in the displayed image, for example how dark and bright areas of the image will appear. Gamma parameter exists because it is necessary to match output characteristics of the display device to characteristics of the human eye, and is very important. To determine current gamma of the display, observe the image on the left (courtesy: Norman Koren).
If you watch this image at a distance, you may notice that there will be an area along the columns on the left where the two columns "blend" in the background. On LCD monitors, you may also notice that this area shifts as you change the vertical angle that you view your monitor at. For this reason, it is very important that you view your LCD monitor at a 90 degree vertical angle, especially when performing this adjustment.
The area where columns blend marks the current value of display gamma, which should be 2.2 according to a standard for computer displays (the complete specification would be: sRGB color space, Color temperature: 6500K, Gamma: 2.2). Lower gamma values will deliver lighter images that look washed out, and higher gamma values give dark, charred image appearance.
CRT monitors usually don't have gamma control on them, but most of these monitors also exhibit acceptable values of gamma (2.1 - 2.3) when their brightness is adjusted properly, so it may not be necessary to apply additional correction. If your display still needs adjustment, you can use the "Gamma" controls from the "Desktop Color Settings" menu of the graphics card, as mentioned in the beginning of this text under "General Setup".
At the time of this writing, LCD monitors were still far inferior to CRT's when it comes to gamma parameter sensitivity with viewing angle change. In addition to this, many LCD's have their native gamma set too low, resulting in too light and washed out images. For these reasons, adjustment of gamma parameter can bring decent improvement on these. If the adjustment is not available in monitor's menu, it should be done in the graphic card's menu like in CRT example above.
Very good tutorials on this and similar topics can be found on Norman Koren's website: www.normankoren.com
Rendition of Highlights
CRT users may as well skip this section, as these monitors rarely have problems with highlights. LCD monitors on the other hand have some issues worth investigating, observe the grayscale image below (courtesy: Norman Koren):
This image contains 20 grayscale boxes up to the full white level, and on a good monitor you should be able to barely distinguish the steps. At the time of this writing, most LCD monitors exhibited two problems with highlight rendition:
- Color temperature drop towards the full white level.
- Luminance saturation towards the full white level.
First problem (if existent) can be observed by comparing the color of the two far left boxes marked "255" and "236". LCD monitors tend to display the full white with a yellowish hue, so the light grey box next to it appears slightly bluish (cooler). This can also be observed gradually along the grayscale, and such behavior can lead to unnatural appearance of highlights in photographs. This problem is difficult to correct manually, the safest way would be to use a special calibration device that would produce an ICC/ICM color correction profile for the monitor.
Second problem relates to characteristics of the monitor itself, and shows sensitivity to the viewing angle as well. Incorrect viewing angle leads to blending of the highlight tones into a single shade, and gives an impression of overexposed photographs. Depending on which brightness controls your LCD has, playing with them might improve the issue, but viewing at a correct angle is usually the best that you can do.
ICC/ICM Color Correction Profiles
The best and most precise way to get faithful display on your monitor is to calibrate it with a special device that would produce a color correction profile. This profile is then loaded into the graphics card to provide precise correction of the data sent to the monitor. Different manufacturers recently started to offer these small devices at more affordable prices than before. They usually connect to a USB port and have suction caps to attach them on the screen. Prior to calibration, you should cancel all adjustments you may have done for the graphics card ("Desktop Color Settings" and similar menus), and your monitor should itself be adjusted according to the "Black Level Adjustment" and "Contrast Adjustment" steps.Upon startup, calibration software should ask you for the parameters of the profile that you wish to calibrate for (example: 6500K, Gamma 2.2). Next, control patterns are displayed on the screen to be measured by the device and a correction is calculated. At the end of the process, calibration software outputs a file with the .icm extension that can be loaded as a monitor correction profile, or the software provides loading automatically.