Panoramic Photography
Digital photography has vastly improved the photographer's ability to recreate and share the ambient of a place he has visited. The ability to produce a high quality photograph existed before, but panoramic photography together with just average computer of today can bring you quite a new and realistic experience - Virtual Reality panoramas.
- Traditional panoramas actually bring you photographs with wide angle of view, suitable for scenes that would otherwise be difficult to take in one shot. Additionally, they also provide high resolution images with astonishing detail that can be printed on large format canvases.
- Virtual Reality panoramas on the other hand offer you the possibility to view the photographed scene as if you were there, and they rely on your computer to process your view commands. You have control of the virtual camera, you can pan your view over the available area, or you can zoom in and out. These panoramas in photo albums have a "(VR)" sign after their name.
Both kinds of panoramas are photographed in much the same way, and it is only the choice of "final container" that will determine whether it will be viewed (or printed) as a photograph, or should it be viewed on a computer as is the case with VR panoramas.
How panoramas are photographed
Simple, cover your wide scene with multiple shots with your camera, as you would use tiles to cover the floor. Shoot in portrait camera orientation, as it is more convenient than landscape orientation. Well actually it is not really that simple, some important conditions must be satisfied to make the final panorama assembly possible:- Adjacent images must overlap sufficiently, recommended value is from 1/4 to 1/3 of the portrait oriented image width.
- The camera and the lens must pivot (rotate) around the center of lens optical system's entrance pupil.
- Shoot in RAW mode exclusively with fixed exposure parameters and fixed lens focus, if RAW mode is not available then make sure that white balance is also fixed in addition to exposure.
Overlap between the images is necessary in order to stitch the images successfully. Stitching software attempts to find "control points" in overlapped areas and use them to calculate a warping transformation for each image. In ideal conditions, warping transformation will produce a perfect match between images in overlapped areas, and the following two operations - stitching and blending - will be trivial. Note that there are cases when control point generation is difficult, mostly in featureless areas like clear skies or rapidly changing objects like water surface or moving clouds. In this case, images have to be positioned manually in the panorama.
Entrance pupil center (widely confused with lens nodal point) is a special point along the optical axis having a property that images taken while lens pivots around it will be free from parallax error. This point can also be defined as a center where image projection rays intersect, or a perspective cone tip. Pivoting (or rotating) the lens around this point will keep parallax angle of each object in the scene constant, for example a nearby tree will remain stationary against the far background landscape. If parallax angles change introducing the so called parallax error, the tree would appear to move slightly against the background, as if you were shifting (not rotating) your head left and right. Keeping parallax error low is essential for successful stitching, and is especially important for panoramas taken with wide angle lenses and with significant depth of field, like in closed space. Requirements mentioned above are achieved by shooting a panorama from a tripod and using a special panoramic head to pivot the camera, more about this can be found in the panoramic equipment page.
Useful Tip: It is not always possible to carry that heavy tripod and panoramic head along with your gear, but it is still possible to shoot a decent panorama from hand. Photographic lenses are designed as endocentric systems, meaning that the location of entrance pupil is inside the lens. Entrance pupil is defined as an image of the aperture stop, in our case the aperture diaphragm while observing the front side of the lens. Therefore, you can estimate the entrance pupil position by judging how deep the aperture diaphragm looks. For wide angle lenses this position is usually close to the front element and remember, you are judging the position of its image that you see, not the actual placement of the aperture diaphragm inside the lens. Next, by using a stable support for your left hand (like a small pillar, fence, someone's shoulder), fold out your thumb and place the front end of the lens on it, aiming for that estimated (or previously measured) entrance pupil center location. Now shoot the images by pivoting around your thumb, many successful panoramas on this website have been created in this way. (P.S. Theory behind the "No Parallax Point" is quite extensive and this text is only a simplified introduction.)
Fixed exposure, white balance and lens focus setting will ensure that blending between images becomes invisible, otherwise stripes will appear in final panorama. RAW mode offers various kinds of precise adjustments like white balance and exposure compensation to be carried out before the images are converted to a standard format for further processing.
How panoramas are processed
Conversion from RAW files has been mentioned already, so we'll assume that we have obtained a number of images converted with same parameters and constant white balance. Same as the delicate processing of a good photograph, complicated panorama workflow benefits from high data precision, so RAW conversion output should be set to 16-bit instead of 8-bit. TIFF format (with or without lossless LZW compression) supports 16-bit images and has proven to be a handy intermediate format during processing.Actual decisions on which workflow path to choose depend on many factors, for example lens characteristics and contents of the photographed scene. Without going into deep details, process workflow may consist of these steps:
1. Lens correction for vignetting, distortion and chromatic aberration.
2. Panorama stitching and blending.
3. HDR image generation (for HDR panoramas only).
4. HDR tonemapping (for HDR panoramas only).
5. Photographic processing.
6. Print preparation (optional, depends on the output device).
7. VR panorama file creation.
Instructions for viewing Virtual Reality (VR) panoramas
Clicking a VR panorama on this website will open a page in your browser and start the Flash Player application. After the panorama is fully loaded, you can use the mouse and button commands in panorama window to view it: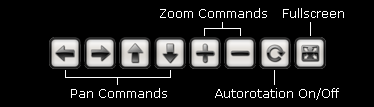
- Pan Command: Left click and hold in panorama window, move the mouse to pan. Or, click the arrow buttons.
- Zoom: Use mouse scroll wheel. Or, click the "+" and "-" buttons.
- Fullscreen: The best viewing experience. Press "Esc" on your keyboard to exit.
- Autorotation On/Off: Click to turn off autorotation, this is convenient if you want the view to stay still where you pointed it.
Some panoramas will allow you to look all the way up (to zenith) and down (to nadir), and these are called Full Spherical (or Equirectangular) panoramas. Others have a limited field of view around the horizon, and these are called Cylindrical. Full spherical panoramas are exclusive but require much more work and special equipment to create, and therefore they have been photographed on places where technical conditions permitted.